
Frequently Asked Questions
What are you having problems with?
If you do not see what you are looking for, contact us
- Installation
- Computer Resource Requirements / Vendor Compatibility
- Scoring
- Customization and Configuration
- Troubleshooting
The first time PEAKS is run, the licence wizard will appear automatically. There are three options:
- Activate PEAKS with a trial or purchased licence key: Pick this option if you have a licence key. Enter the key in the “Enter Licence key” pop up and PEAKS will restart.
- Register to get a free trial licence key: Pick this option if you would like to get a free 15 day trial licence key.
- Use PEAKS as a viewer: Pick this option to strictly view PEAKS projects only.
When prompted to activate PEAKS, choose “Activate PEAKS Studio manually” in the bottom-right corner of the window. The steps to activate manually are as follows:
Gather Information: Input your name, email address, and license key to generate a license request file. It is important that this step is done on the computer on which you will be using PEAKS. From this step, you will receive a license.request file.
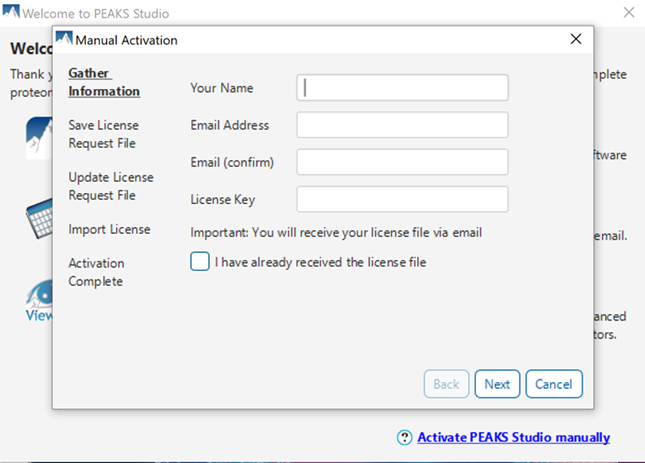
Save License Request File: Select a folder to save the license.request. Do not use this license request file to activate PEAKS – it will not work.
Update License Request File: On a computer with internet connection (it can be any computer, it does not have to be the computer with PEAKS Studio installed), go to the webpage http://www.bioinfor.com/lcs20/index.jsp
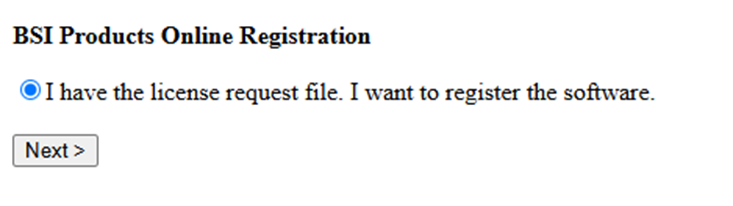
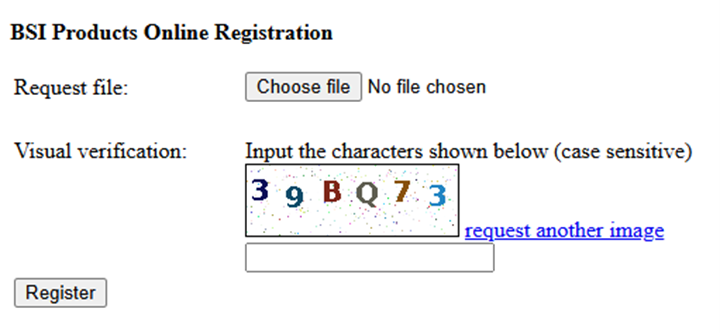
Click on Next and Choose File to select the license.request file. If this license.request file is from a different computer, use a USB key to move it between computers.
Type in the 6-digit verification and then Register
Import License: You should receive an email from support@bioinfor.com with the license.
Back in Manual Activation, copy the license content in the email, or import the license file.
Activation Complete: Click Finish. Performance Configuration will automatically apply, and PEAKS Studio will need to be restarted.
Be sure to complete step 1 on the computer that you want PEAKS to be installed on.
Be sure to use the license file you received from support@bioinfor.com in step 5 in the activation and NOT the license.request file obtained in step 1.
Please note that the following recommendations assume you are not planning on running any additional computationally intensive software on the computer at the same time as PEAKS. If this is the case, then you should ensure that you have sufficient resources for each software.
PEAKS Studio 12.5 is recommended to be installed on 64-bit Windows operating systems with Windows 10 or later.
Recommended Configurations:
Desktop License: at least 30+ threads processors and at least 70 GB+ of RAM with compatible GPU (described below)
Workstation License: 60+ threads processors and 128 GB+ of RAM with compatible GPU (described below)
e.g. Intel Core i7/i9/Xeon or AMD Ryzen 7/9/Threadripper processors
GPU requirements: for a GPU to be compatible with PEAKS Studio 12.5, it must have a NVIDIA CUDA compute capability ≥ 8 with at least 8GB of dedicated memory and must be updated to CUDA version 12.3 or later.
DeepNovo (standalone): A compatible GPU is required to run the DeepNovo algorithm. If a compatible GPU is not detected, this workflow will be unavailable.
DeepNovo Peptidome: This workflow can be run with or without a GPU. If a compatible GPU is enabled, the DeepNovo algorithm will be used at the de novo sequencing step. If there is no compatible GPU, the traditional de novo algorithm will be used at the de novo sequencing step.
DIA: The DIA workflows do not require a GPU. However, faster analysis times (~1.5-2x) can be achieved for the DIA database search step when a compatible GPU is enabled.
The DeepNovo workflow is likely grayed out because PEAKS does not detect a compatible GPU on your computer or the GPU is not enabled. A compatible GPU (CUDA version 12.3 ≥ ; CUDA compute capability ≥ 8; memory ≥ 8GB) is required to run the DeepNovo algorithm.
You can access the Performance Configuration options under the Configurations tab within PEAKS. The first time you start PEAKS, it will consider your available computer resources and then allocates threads and memory automatically. These numbers can be changed.
We recommend that you allocate only up to ~80% of your total threads and memory. The appropriate amount of memory to allocate can be calculated as (# threads allocated to PEAKS x 2) + between 8 and 16 GB. Allocating significantly more or less memory than this may lead to crashes.
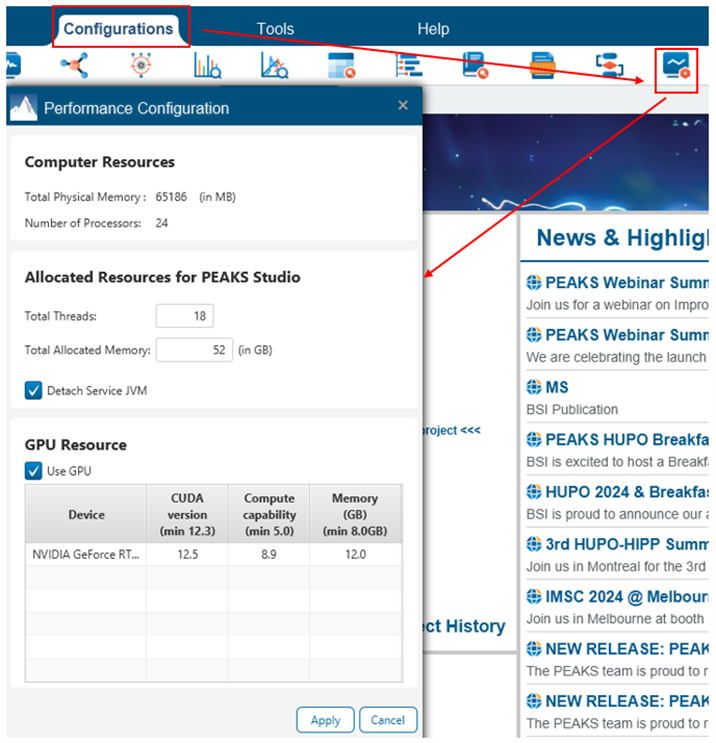
In the example above, Memory = (18 x 2) + 16 = 52 GB.
If you do not have enough memory to satisfy this requirement, we recommend that you reduce the thread count.
First, try restarting PEAKS and your PC. This may be enough to make PEAKS display the new memory.
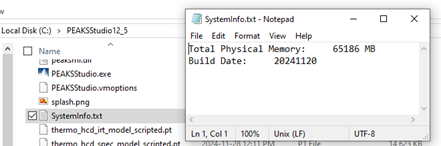
If that doesn’t work, you may need to update it manually. Go into your PEAKS installation folder, and open the file called SystemInfo.txt. There, change the value next to “Total Physical Memory” so it reflects the correct memory. Be sure to save the file. Then, restart PEAKS.
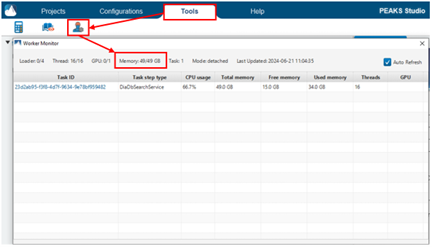
PEAKS may still not display the correct memory in the Performance Configuration settings. To check that PEAKS recognizes the memory, go to the Tools tab and select the Worker Monitor. The “Memory” will show the currently used memory/total memory. The total memory should reflect the correct memory.
PEAKS Studio/Online:
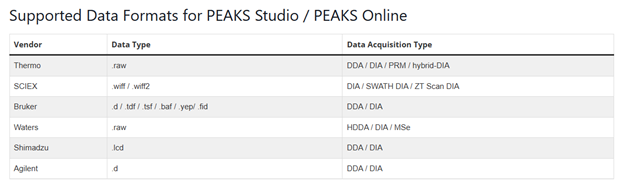
AB: From manual: Thermo Fisher, SCIEX ZenoTOF and Bruker TimsTOF data (To open an instrument’s raw data using PEAKS AB, it is necessary to install PEAKS AB on the same computer where the instrument vendors’ own software is installed)
GlycanFinder: Orbitrap, timsTOF and ZenoTOF data (from website)
Supported fragmentation types are CID, HCD, ETD, MIX (HCD and EthCD), PQD, IRMPD, ETHCD, EAD, NONE
We cannot 100% guarantee that older versions of PEAKS will be compatible with current/future operating systems. However, users have had success installing versions as old as PEAKS 7 onto Windows 10 and 11.
You may need to change some permissions settings to get it to work. Please see the question under the “Troubleshooting” section: “I can suddenly no longer open / load data into / run an analysis in PEAKS XPro or earlier versions” for instructions on how to set these permissions.
Local Confidence is the confidence that a particular amino acid is present in the de novo peptide at a particular position. It is presented as a percentage and is colour coded. Hover over the peptide sequence in the table to see the local confidence scores.
Average Local Confidence (ALC) is the average of the local confidence scores for a peptide.
Usually, you will find good peptides at 55% and above. This does not mean that the whole sequence is the correct sequence. This is because the beginning and end of the spectrum are much more difficult to interpret when it comes to de novo sequencing due to the high mass/low mass of the ions produced by these fragments. Users should consider the local confidence at the amino acid level in addition to the average local confidence.
To remove the low scoring amino acids, do this, click on the score threshold slider button above the peptide table in the de novo result. Use the slider to set a score threshold and any amino acid below that threshold will be reduced to a mass tag in Daltons. Once you export the peptide table from the result page, the last column in the excel export will follow this confidence threshold.
The -10lgP score is a p-value on an increasing scale. For example, a p-value of 1% equals a -10lgP of 20. For a given score x, its equivalent P-value is the probability that a false identification has a score greater than or equal to x. For more information on the scoring system see the following: Database Search Scoring
The Confident Amino Acid (CAA%) seen in the DB search result refers to the percentage of amino acids which are considered confident. A “confident” amino acid is considered as one with supporting fragment ion pair having intensity ≥ 2% of the base peak. Hover over the peptide in the table to see the individual amino acid fragment ion intensity percentages.
The AScore is an ambiguity score which indicates the positional confidence of a variable PTM. It is calculated as -10×log10P, where the p value indicates the likelihood that the site is assigned by chance. Therefore, the higher AScore the better. An AScore of 20 is a P-value of 0.01.
PEAKS provides two options for users to determine confident modification sites:
- Minimal ion intensity, which requires that the relative intensities of the position-determining fragment ions in a MS/MS spectrum must be higher than the number user’s input.
- AScore
The minimum ion intensity and AScore required for a confident modification can be set by the user in the Summary page of a result.
The significance score is calculated as the -10logP of the ANOVA significance testing p-value. A significance score threshold of 20 equals a significance testing p value of 0.01.
Glycan Score: The normalized sum of the glycan fragment ion and glycopeptide Y-ion log intensity
Peptide Score: The normalized sum of the peptide fragment ion log intensity, without glycan fragments. Different fragmentation type considers different peptide fragment ion:
- CID and HCD considers b, y ions
- ETD considers b, y, c, z, z’ ions
- ETHCD considers b, y, c, z, z’ ions
S-Score (%): Measures the confidence of the top glycopeptide candidate compared to other candidates for the spectrum. For glycan candidates with the same composition and same peptide, the candidate is sorted by matched glycan Y-ion count. S-Score = (most Y-ion count – 2nd most Y-ion count)/(most Y-ion count). The higher the score the better. An S-score of 100% means there was only 1 result. An S-score of 0% indicates that the first- and second-best match have very similar evidence, and we cannot be confident about which of the two that it is. and Ascore required for a confident modification can be set by the user in the Summary page of a result.
PEAKS requires the database to be in a .fasta format. If the file extension has .gz on the end after downloading, the file must be unzipped prior to loading into PEAKS. When configuring, select the correct FASTA format database (UniProt or NCBI). If this is a custom database, ensure the header only contains standard ASCII characters and obeys the parsing rules set in the Advanced Options.
PEAKS has an option to validate the database to ensure there are no invalid characters. After validating or configuring the database into PEAKS, you will be shown the number of protein sequences that PEAKS detects in the database. Make sure that this number is what you expect – if it is lower then there are likely formatting issues.
For PTMs with a neutral loss mass, PEAKS will search for both the monoisotopic mass of the modified amino acid as well as the neutral loss mass. PEAKS does not require the neutral loss mass to be there in order for the modified amino acid to be identified. It does help if it is present.
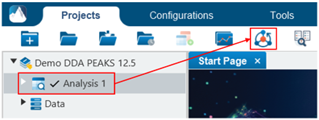
Highlight your analysis and click on the “Modify Analysis” icon in the Projects tab. Make your desired changes to your parameters and click finish.
PEAKS will only re-run steps affected by the parameter change and the steps that come after. For example, if you run a DB search and then modify and add an LFQ analysis without changing any of the database search parameters, the database search step will not need to re-run and only the new LFQ step will run. The result will be in a new analysis.
Yes, you can do this by creating a custom enzyme with combined digestion rules for both enzymes under Configurations > Enzyme. The following example shows how to combine the digestion rules for Trypsin and Lys C. Add the digestion rules for each enzyme in a separate row. PEAKS will search for peptides obeying either set of digestion rules.
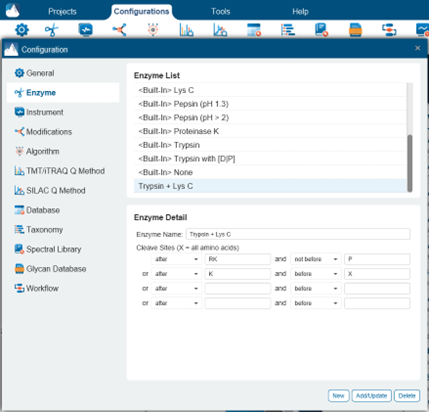
For combinations of enzymes with a large number of cut sites, setting “None” as the enzyme with “Unspecific” digestion may work better than creating a custom enzyme.
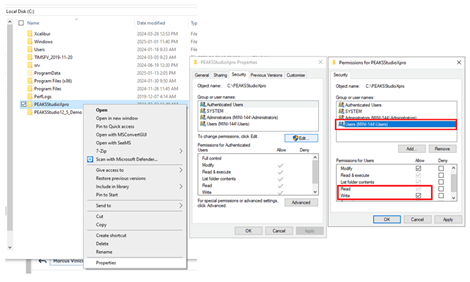
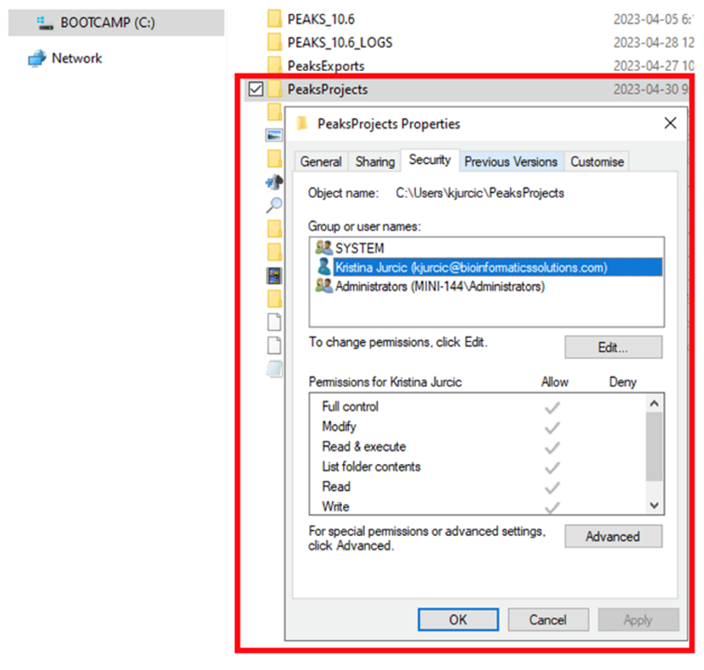
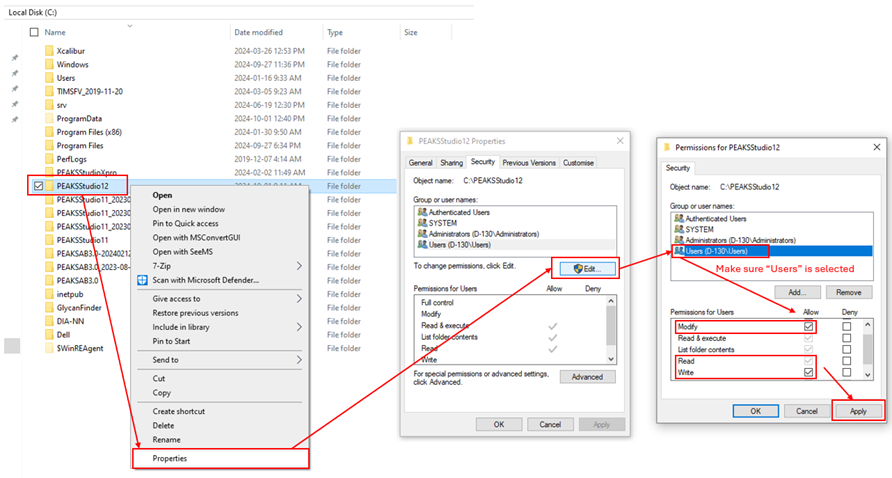
This is likely caused by your windows user account not having the proper permissions to Read/Write/Modify to the local ‘derby server’ that is used in PEAKS. Here is how to fix this:
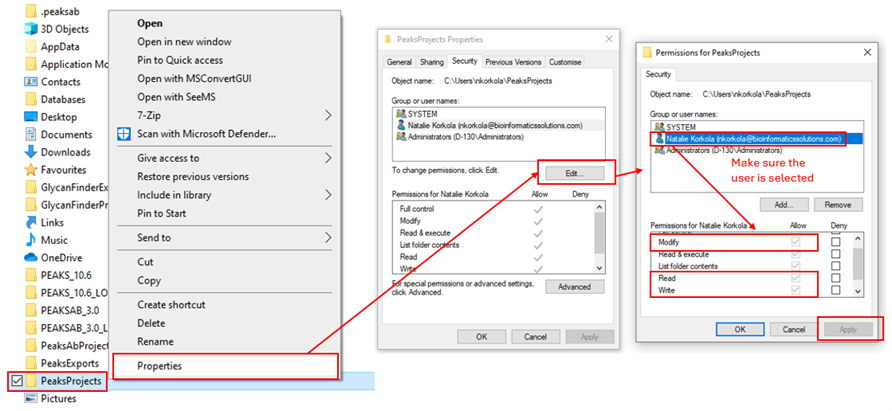
Ensure Read/Write/Modify permissions are given to the windows user account accessing PEAKS on the PEAKS installation folder, the project location folder, and the folder in which the raw data is stored. It is important that “Users” is selected when adding the permissions.
Close PEAKS, go to C:\Users\[your user name]\PEAKS_10.6, and delete the folders: defaultproject, defaultTaskDB, and derbyServer. Then, restart PEAKS.
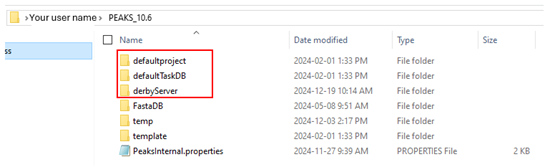
Once you make those changes, those folders should be reset with read/write permissions associated with your user account.
I received an error during my database search that says “No fasta sequences found in the database”
This error is caused when the Taxonomy is filtered to only include species that are not actually found in the fasta file or when the Taxonomy is filtered on fasta sequences with a non-UniProt parsing format.
Before proceeding with a search, ensure that the number of sequences, shown next to Set/View, match to the number of sequences that you expect.

This is usually a memory or hard drive space issue. First, ensure that the drive in which PEAKS is installed and the drive containing your PEAKS projects have adequate space.
Next, see the question “How do I properly allocate resources to PEAKS?” under the “Installation” section and ensure you have the right amount of memory allocated for your thread count. Even when using PEAKS as a viewer, you will still need adequate resources to open and view projects. Very large projects may not be able to be viewed on a laptop, for example.
Occasionally, results may open to a blank if you have too many projects open at once. Try closing a few projects, then try to open the project again. If this does not work, try closing and re-opening PEAKS.
This is usually caused by missing permissions. Ensure that Read/Write/Modify permissions are all enabled for the PEAKS installation folder, your PEAKS Projects Folder, and the folder in which your raw data is stored. It is important that the permissions are added for the “Users” or the user trying to access PEAKS.
Close and reopen PEAKS, then try creating the project again.
This is usually caused by missing Read/Write/Modify permissions for the user on the folder in which the raw data is stored. Follow the steps under “I get an “Unable to Create Project” error” when I try to create a new project/start an analysis” to set the permissions.
Additionally, make sure your raw data is stored on a local drive and not on a Network drive.
- Go to the start menu and open the control panel by typing ‘control panel’
- In the top right search bar, type ‘power’ and open ‘change power settings’
- Switch to the high-performance option
- Also, select ‘change plan settings’ and then ‘change advanced power settings’
- Find ‘turn off hard disk power’ and switch it to 0, this means the hard disk power will not turn off
- Also turn all sleep options to ‘never’
The progress bar in the bottom right corner of PEAKS monitors which step in the analysis is currently running and will update each time an individual task finishes. Green means that the task has been completed. Dark blue means that PEAKS is currently running that task, and orange means that the task has not yet started.
PEAKS may multi-task and run multiple lower-demand tasks at the same time to maximize computer resources.
Certain tasks will complete very quickly, and others can take a long time. Since the progress bar only updates each time a task completes, it may appear as if no progress is being made on long-running tasks such as DIA database searches.
You can check to see if your analysis is still running by looking at the Worker Monitor under the Tools Tab. Be sure to check Auto Refresh to see usage updates in real time.
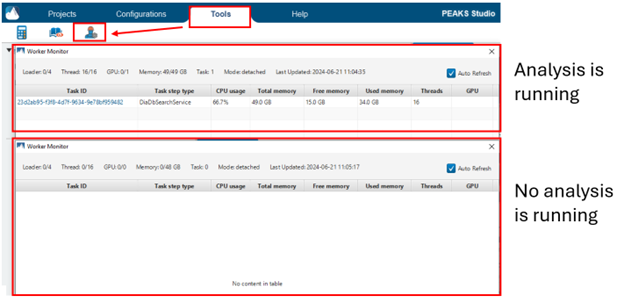
If you see that there is a task ID in the table and you see the CPU and memory usage updating every few seconds, this means that PEAKS is actively working on this task. In this case, you should wait for the analysis to finish.
If the worker monitor appears empty and does not update after waiting a few seconds, then it means the analysis is no longer running. If this is the case, and the progress bar does not show that the analysis has completed, then your analysis has likely crashed due to issues with memory allocation. Please see the information under “How do I properly allocate resources to PEAKS?” under the “Computer Resource Requirements / Vendor Compatibility” section to see if your memory / threads are allocated correctly.
First, double-check that you have properly set Read/Write/Modify permissions on your PEAKS installation folder, PeaksProjects folder, and the folder in which your raw data is stored. For more details, see “I get an “Unable to Create Project” error when I try to create a new project/start an analysis” under the “Troubleshooting” section.
Next, check if your resources meet the minimum requirements and are allocated properly. See “What are the recommended resources for PEAKS Studio/Online/AB/GlycanFinder?” and “How do I properly allocate resources to PEAKS?” under the “Computer Resource Requirements / Vendor Compatibility” section for more information.
This error message may occur due to task timeout or too large of a search space.
By default, if a single task in PEAKS takes longer than 24 h, then the whole analysis will fail. If you noticed the progress bar stay at the same percentage for 24 h, then your issue is likely task timeout. This is more common for large DIA searches on computers with low resources.
You can increase the time required for a task timeout failure in the peaks.conf file found in the PEAKS installation folder. Setting it to 100 h is usually sufficient.

This error can also be seen sometimes when the search space is too large. Try decreasing one or more of the following database search parameters: the maximum number of missed cleavages, the number of variable PTMs included in the search, or the maximum allowed variable PTM per peptide. You can also try using a smaller database. We recommend a database that is focused to what is present in your sample.
Finally, unchecking “Detach Service JVM” in the Performance Configurations may help your search complete successfully in scenarios where your search space is very large.
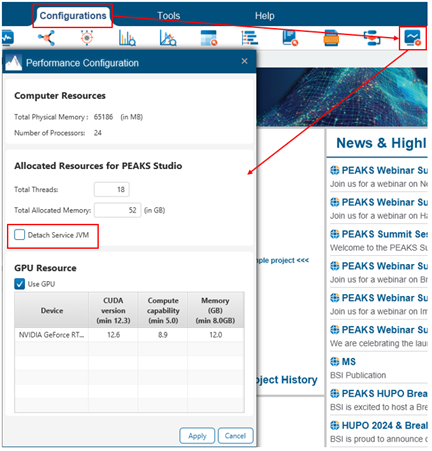
Be sure to close and reopen PEAKS after changing the performance configuration.
Other Products & Services
For questions pertaining to other products and services, please contact support.